
Add Click-to-call to your web page or app
Callers reach your bot from Chrome, Safari, or Edge, or from an Android or iOS app, and they have nothing to install. Live Hub is the WebRTC gateway that bridges those clients to the SIP side.
Most sites need only the JavaScript widget. You download it from the SIP connection itself and add it to your web page, and there is nothing to request from AudioCodes.
Use an SDK when the widget is too rigid for what you want to build: your own call interface, or a call button inside a mobile app. Live Hub support supplies those packages, through the chat channel or a support request.
In a web page
The JavaScript widget
The JavaScript widget is a ready-made component that you embed in your web page. Live Hub generates the example files for you, specific to the connection.
To use the widget:
-
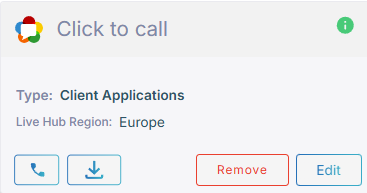
In the Navigation pane, expand Voice channels, and select SIP connections.
-
On the Click-to-call connection's card, click the download icon
 .
.
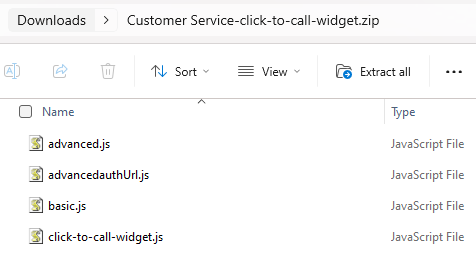
The example files download to your computer. They are unique to the connection you downloaded them from.
-
Edit the file that matches how you want to authenticate callers, and then embed it in your web page.
File Use it for What to change click-to-call-widget.jsevery setup Nothing. Store it on your server and include it in your front end. It serves all your SIP connections. basic.jsbasic authentication Paste it into your main .htmlinside a<script>tag, and replaceREPLACE_USERNAMEandREPLACE_PASSWORDwith the credentials from your SIP connection.advancedauthUrl.jssession cookies Paste it in the same way, and replace "authURL":""with your back end's endpoint. Your back end requests the authentication code from Live Hub, using an access token. See Authentication. The widget requests a fresh code for each call.advanced.jsbearer tokens Paste it in the same way, and replace the generateCodefunction with your own, returning an authentication code from Live Hub.advancedauthUrl.jsandadvanced.jsare the recommended options: both use the authentication code.The client application in the caller's browser cannot reach Live Hub directly: only your back end can, using an access token. The widget can run with no authentication at all, but do not deploy it that way.
-
Click the widget to place a call.
The following example shows a
generateCodeimplementation foradvanced.js, the bearer-token file:function generateCode(config, payload) { return fetch('REPLACE_URL', {}); }
For more information, refer to the WebRTC Click-to-Call Widget Installation and Configuration Guide.
The web SDK
If the widget is too rigid, build your own interface on the web SDK instead. The SDK handles WebRTC call management, leaving the user experience to you.
To use the web SDK:
- Create the web page you want the call to start from.
- Call the SDK from the page's code.
- Style the page and define its behavior as you need.
For more information, refer to the WebRTC Web Browser Client SDK API Reference Guide.
In a mobile app
Both mobile SDKs work the same way. You initialize the SDK with your configuration, which is the SBC domain and the user credentials, and your users can then place WebRTC calls from inside the app.
- iOS — WebRTC iOS Client SDK API Reference Guide
- Android — WebRTC Android Client SDK API Reference Guide
Customize the widget
The widget is a web component, so you style it with CSS through ::part, or by
injecting a stylesheet into its shadow root.
The background
To replace the widget's background, target the click-body part:
click-to-call::part(click-body) {
    background: url('./ac-bg.png');
    height: 100vh;
}
The button
The button lives inside the shadow root, so add a <style> tag to it from script:
<script>
    document.addEventListener("readystatechange", () => {
        const shadowHost = document.getElementById("click2call");
        const shadowRoot = shadowHost.shadowRoot;

        if (shadowRoot) {
            const style = document.createElement("style");
            style.textContent = `
                .click-to-call-body-frame #c2c_call_btn {
                    background: linear-gradient(90deg, #195993 0%, #28C7DE 100%);
                    border-radius: 60px;
                    height: 33px;
                    border-width: 0;
                    font: 12px "Poppins", sans-serif !important;
                }
            `;
            shadowRoot.appendChild(style);
        }
    });
</script>
A complete example
This example applies both customizations: the background through ::part, and the
button through the widget's shadow root.
<!DOCTYPE html>
<html lang="en">
<head>
    <meta charset="UTF-8">
    <meta name="viewport" content="width=device-width, initial-scale=1.0">
    <title>Click-to-call Custom Styling</title>

    <!-- Click-to-call SDK -->
    <script src="./click-to-call.js" type="module" defer async></script>

    <!-- External Style -->
    <style>
        click-to-call::part(click-body) {
            background: url('./ac-bg.png');
            height: 100vh;
        }
    </style>
</head>
<body>

    <!-- Click-to-call Component -->
    <click-to-call id="click2call"
        form='{"isValid": true}'
        config='{"c2c_config":{"caller":"<REPLACE_USER>","password":"<REPLACE_PASSWORD>","callerPhone":"REPLACE_CALLER","call":"<REPLACE_CALL>","dtmfKeypadEnabled":true,"keepConnectionAfterCall":0},"c2c_serverConfig":{"domain":"<REPLACE_DOMAIN>","addresses":["wss://<REPLACE_DOMAIN>"]}}'>
    </click-to-call>

    <!-- Attach Custom Styles -->
    <script>
        document.addEventListener("readystatechange", () => {
            const shadowHost = document.getElementById("click2call");
            const shadowRoot = shadowHost.shadowRoot;

            if (shadowRoot) {
                const style = document.createElement("style");
                style.textContent = `
                    .click-to-call-body-frame #c2c_call_btn {
                        background: linear-gradient(90deg, #195993 0%, #28C7DE 100%);
                        border-radius: 60px;
                        height: 33px;
                        border-width: 0;
                        font: 12px "Poppins", sans-serif !important;
                    }
                `;
                shadowRoot.appendChild(style);
            }
        });
    </script>

</body>
</html>